Monday 31 December 2012

The end of 2012... and new hobby!

I have loved playing around with wire for the past few months though recently I have been trying out something new.. Something that I recon should go great with wire wrapping. At the moment I am just experimenting with some basic techniques. So this new mysterious hobby is........... Resin jewellery!

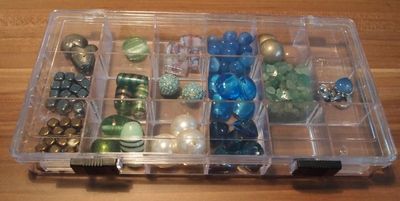
What I love about resin is that it is really versatile and is great to use with different little bits and bobs.. If you have a favorite flower, picture or symbol you can easily "drown" it in resin and it will for ever stay in there. You can also use different techniques to colour the resin and make bracelets, cabochons or lovely pendants.
So far I have only finished a couple of pieces which I am very happy with.. But it seems about right with me, as I am never completely happy with my pieces of work. Having more time to perfect the craft would be useful though.

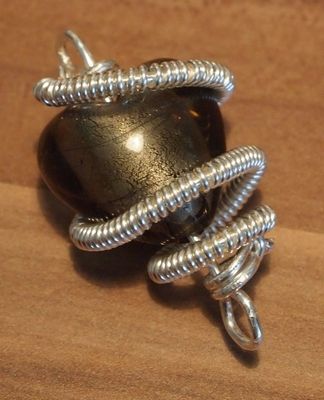
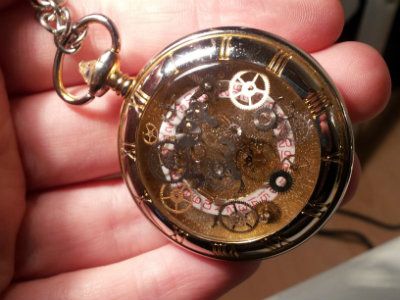
Recently I have been looking into steampunk style jewellery and got a couple of ideas of how to combine different techniques to create some cute little items. I have taken some cheap pocket watches and opened them up to remove all the parts inside. By using some watch spares and combining them with resin I have created this beauty. I've been wearing it to work and got a few compliments from my colleagues and friends. Definitely need to stock up on more pocket watch shells to make some varied designs.. Here are some pics.


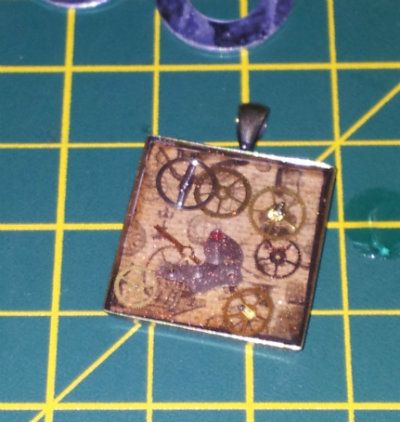
Today after a trip to The Range (Shop in the UK which sells some random bits of arts & crafts related stuff, as well as other things for home, etc) I purchased some new items that I can incorporate into the jewellery. Some art paper with Steampunk style prints and some fabric dye for resin colouring. After playing around with some blanks here is another little item I made:


After taking pictures of both necklaces I have realised that there are quite a few bubbles in each though.. So next time I will look into using blow dryer to hopefully get rid of them.. Watch this space! If anyone wants any tutorials on this please let me know! My other half also got me a Macro lense (Yipeeee!) for my camera for Christmas so I will be using it to take some higher quality pictures of the items. Also considering making a light box to properly light them as well.

More importantly HAPPY NEW YEAR! Hope 2013 will bring you guys a lot of happiness and creative inspiration. I sure hope it will bring me some! ;)


Wednesday 17 October 2012

Tree of Life

Recently I was looking to try out some different designs that I haven't attempted yet. Tree of Life pendant looks interesting and really effective. It would always remind me of a little Wire Tree that my parents had back home. That tree was meant to bring luck and money.

So anyway, I have looked on Youtube again to see any tutorials. Though I must admit I am guilty of never fully following tutorials and tend only get the jist of the whole project from the videos. The rest I work out myself to make it work for me. On the video I have watched for this, 0.3mm wire was used for branches and the actual tree. At the time I only had 0.6mm wire but it does the job. For future attempts I have ordered some 0.3mm wire and will look into smaller beads as these seemed a bit too big. Especially considering the whole pendant is about 4is cm in diameter. So is pretty big as it is.

In my opinion, the good thing about this design is the fact that you can fit it any season. Mine is green as I love spring and summer but for this time of year mixing in red and orange beads would create lovely autumn leaves. I will also look into creating different shapes within the round pendant and expand the idea. So maybe use symbols, etc. Like the "Peace" sign perhaps?

Here is my take on Tree of Life! Hope you like it. :-) V. x


Herringbone Wire Wrapping

Here is a video I have come across today. I have seen Herringbone Wire wrapping on several forums and blogs and really liked how it looks however never quite knew how to make these beautiful little links. Here is Youtube video with exact instructions:

Watch "How to Create a Herringbone Wire Wrapped Bead" on YouTube

Wasn't all that difficult, was? :-) Now give it a try and see if you can get it up to scratch! Below I'll include a picture of my  first attempts! I am really chuffed to find out the correct way of making these. :-D


Friday 21 September 2012

Rings


Internet and magazines are full of different ring designs. At first I have attempted some simple basic designs such as simple wire wrapping rings. I am aiming to make some Herringbone weaved rings. Haven't really quite figured those out yet but practice makes perfect!

The two rings above are my most recent attempts. I have combined copper and silver plated wire in order to create the bottom design. I have used simple wire weaving and then spun the ends around in order to create fastening with spiral ends. You could have a play around with longer pieces of wire and create different shapes. You could use some beads to make them more unique.


Now the top ring is my favourite! I have started it off by platting 3 strands of wire to make it big enough for my ring size. It's a simple plat that you'd use in your hair. Trying out 4 strands of wire should work perfectly too and make the ring a bit thicker. Once the sizing is perfect I have twisted the wire ends and pressed them down to form little spiral effect over and over until about an inch of wire ends were left. Then I have wrapped the ends on either side of the ring band. It has that celtic look about it and looks so great! I am definitely wearing that one soon!!!


The power of Grey

The great thing about beads is that they come in different shapes and colours! This provides us jewellery makers with inspiration and ability to create unique pieces of work. Even though I love brightly coloured beads, pastel coloured and natural looking beads are my weakness! So while at Hobby Craft I could not resist getting some white, silvery and grey beads. Combining with silver plated wire I've been using for the last couple of months I thought they'd make a nice piece.

Finally I have found some time to make some jewellery! A bit ironic considering I am off sick from work...
So anyway.. I have used 0.8mm silver plated wire and 6 beads from the chain. I wanted to create something very simple and elegant but with a little bit of detailed. I used simple techniques to achieve this look and pretty sure anyone can attempt this!!!


I just love how silver wire makes the beads look brighter. This item is very wearable as it doesn't really need to match any of your clothing. That's the great thing about natural coloured beads such as these! And even more importantly, the whole bracelet cost about £1!!! BARGAIN! :)

Cabochon Wrapping

As I have mentioned in previous posts, I have invested into a couple of magazines which I have been scrutinizing for a good few weeks now. n one of the magazines I have discovered a great way of wrapping cabochon beads. The cabochon that I bought is a turquoise howlite from eBay. I wanted to try out the techniques and experiment with wire.


The design in the magazine had a slightly different finish. Instead of curls in the middle part of the pendant, it was crossed over and wired around the back. I must admit I have run out of wire length by that point so I had to improvise which I don't think turned out too bad. Especially for a first attempt... :) It's delicate and very wearable and I can't wait to wear it to work next week.

Simple but cute!

During the last trip to Hobby Craft I have decided to have a wander around the shop and see what other little gems they have hidden. Hobby Craft is great as it has massive variety of different arts & crafts supplies. Ranging from cupcake making or card making to jewellery!

So.... I have come across some really cute wooden leopard print buttons and figured they would make amazing earrings that are unique and stylish! Afterwards I couldn't wait to get home and get stuck in!!! The design is very simple and takes only 2 minutes. I am considering adding some little pearly colored roses in the middle of the button but haven't yet decided if I want to make them more "blingy" however would spruce up the design if you wanted to hide the holes in the middle. Have a play around and see what suits your liking.

Things that you will need:

  • 2 buttons to your liking
  • 3cm of 0.6mm wire
  • 2 earring wires (can be handmade)
  • Wire cutters
  • Flat nose pliers
  • 2 mins of your time!
Here is the result: (Without the roses... Should I add them? How CUTE are the buttons?!)


What do you think? ;)

Sunday 9 September 2012

Latest Shopping Trip

Yesterday me and my boyfriend made our way into Preston to get some supplies for our hobbies. I have patiently waited for him to get his little bits and bobs and then went to Hobby Craft. I could NOT wait! :)
This is where I found Wirework magazine which ended up being a bargain and I was well chuffed with it! Prior to this I have discovered Wirework magazine through browsing online and following the group of Facebook. As you probably know, I was not disappointed! :)

Some of the latest additions to my collection/supplies are some new beads, loads of wire, fimo, etc. Here are some pics:

I have never used Fimo but I am definitely looking forward to it. Making some handmade beads with the designs that I want should be a lot of fun and maybe I'll get the other half involved in this just for fun too! :D What are your recommendations for using Fimo? Maybe any tips?

Latest Attempts

Over the past few weeks I have been very busy with family visiting, work, home life, etc; so had less time to spend practicing my jewellery making. Finally things are calming down a little so I managed to spend a few hours with my wires and beads. I have also recently invested into two magazines and I must say I was very impressed!!! Here are the two magazines I went for: Make Jewellery and Wirework.


I had a quick browse through both and they've been great help! Wire Jewellery had some designs for people with a bit more skill however they look great and definitely can be done. This is an English magazine so easily accessible in UK. I bought mine from Tesco an it was around £5 I think. Not bad value for money!
Now the other magazine I bought is Wirework and I can't praise it enough. This magazine is perfect for newbies! It has basic tutorials with detailed step by step information and pictures. It's so helpful and it's probably the most useful bit of literature I own for wire jewellery learning. One down side to the magazine is that it's American magazine. So it's nothing too dramatic however I had to travel a little to get it from a Hobby shop. It was approx £4 and is the best value for money considering tutorial books are probably 5 times as expensive and have more or less the same info.

So after reading through the magazines I have attempted some of the designs. I have made and finished properly my first Big-ish project. I have made this bracelet yesterday as per design from Wirework magazine. Here is the picture of the final result:


It's a pretty straightforward design and it looks great! Hope you guys like it. If anyone wants me to post step by step tutorial because you can't get access to the magazine, then just let me know. I have also made a suggested variation of the design which can be used in the bracelet or perhaps for making a necklace or earrings.

So guys, any feedback or questions are always welcome! So feel free to comment/ask! :)


Tuesday 14 August 2012

Open Spirals are Cool!... And Easy!!!

While browsing through Youtube I have stumbled upon this useful little video. It is very useful for making lovely identical spirals for earring, pendants, etc. While the technique itself is easy, it definitely saves you some time and effort! :) Check it out and see what you think...


Attempting Wire..

So I thought it's time I posted some of my first attempts of wire jewellery. On my trip to the Arts & Crafts store I decided to invest into a book by Sharilyn Miller on beginners wire work which has really helped out to get started so here are some pics.

Favorite piece so far (possibly a key ring or pendant?)... What do you guys recon?
I have used 1.2mm and 0.8mm wire to wrap plus heart shaped bead. The end result is pretty straightforward  to make however it looks great. It just needs some finishing touches and voila!


I have also stocked up on some home made jump rings which weren't that hard to make with a little help of using the screw driver. I've used the handle of the screw driver with 1.2mm wire and wrapped it around it. Then used the cutters to cut them into identical jump rings. Quick and effective! :)


Monday 13 August 2012

Back to Basics

As much as I would love to dive into some amazing and beautiful designs, it's probably best to try out some easy basic designs at first and master the techniques. On the way home from my first trip to the Arts & Crafts shop I was already imagining the amazing work I will do.

Well let me tell you.. Wire jewellery is not easy! I have previously done bracelets wih tiny little beads but to me it was nowhere near as complicated as working with wire.

I quickly come across an issue which I am yet to research. Jewellery wire is very delicate and needs great care. The tools being metal tend to damage the enamel on the wire. I have a couple of ideas how to avoid this which I will try out later on this evening.

Perhaps you have any tips for this yourself?

Sunday 12 August 2012

First Trip to the Shop

The best advice that was given to me before my trip to the shops was "Get good/high quality tools". So I know that a start up cost of any hobby is pretty high however you can buy certain tools that are more important than the others. make sure you do some research online and make a list of the things you need to get before going to an Arts & Crafts store.

First and most important tools in my opinion are the wire cutters. It's best off the buy 2 pairs of cutters. Smaller pair for delicate thin wire and a bigger pair for cutting thicker wire.


Another very essential tool is round-nose pliers. These come in various sizes and thickness. I have currently got just one pair for making smaller loops and using it to grab loops in order to bend the wire, etc. As I have quickly found out, make sure the handles are very comfortable as you will be using these often and need to ensure they are soft enough not to hurt your hands.


Next important tool is bail-forming pliers. As a beginner I wasn't aware whether these are really important or not. After trying out some basic techniques it became apparent that these are a good investment so I have ordered a pair with 6 different sizes from small 2mm to bigger 9mm loops. However you can always use general things that are found at home. (I found that using the long part of the screw driver works well for making spiral loops.)

Flat nose pliers - are great for holding onto the little pieces and to start off with I got one pair. Make sure that the inside of the pliers does not have any ridges as these will damage the wire very easily. The pliers can be found in most tool shops or arts and craft stores. (I found that pliers from tool shops have more comfortable handles but also come in mini size for comfort so check out your local B&Q or Walmart.


When you start making twists and loops you will need to get some jewellery files to remove any visible sharp corners. I have ordered mine from Ebay and they come in a set of about 5 or different shape and size like round or flat file. 

Next, Storage! With all the tools and other small bits you will definitely need a bigger box to store bigger parts as well as a small box with compartments to store all the beads. I have bought a variety of beads to start off with and will use different techniques in order to establish which beads work best. It's best to get a variety of colours however if you don't fancy buying too many beads you can always take apart old inexpensive jewellery that you no longer wear.


Finally, and probably most importantly.... WIRE! These come in various sizes and gauges so to start off with I have bought 1.2mm and 0.8mm wire to play around and learn some basic techniques. After playing around with it for a couple of days I have ordered more wire in 0.6mm and 1mm for more intricate work. Use this table from http://www.wirejewellery.co.uk as a guideline to different sizes as it appears different companies and sites use either mm or gauge to identify wire sizes.
0.4mm28-gaugeBinding, knitting, crocheting and weaving
0.6mm24-gaugeThreading small delicate beads (i.e. semi-precious chips), binding and twisting
0.8mm20-gaugeGeneral-purpose jewellery work
1.2mm18-gaugeChunky pieces and ring shanks
1.5mm16-gaugeBold, chunky jewellery, bangle and tiara frames
2.0mm14-gaugeVery chunky jewellery and accessories
Now that you have first essential bits just have a good play around with the different tools, beads and wires making loops and twists, etc. :)

The Beginning

As my first ever post on this blog I would like to give a little bit of background as to what I have previously done and reason for my interest in wire jewellery.

I have always had an interest in making things with my own hands. Originally as a kid I have started off by making cards, cross stitch, knitting, sewing, etc. As I have grown up in Latvia we were taught a lot of things at school which is where my interest began. I have used different materials and got the feel for different types of arts & crafts.

In the last couple of years I have stopped making as many things due to lack of free time but still had a great interest in all things handmade so I have been a fan of Etsy and Pinterest for a while. More recently I have noticed a type of jewellery making which was unusual and intricate- "Wire Jewellery". The detail as well as craftsmanship really grabbed my attention and sparked my interest in this art. I thought I'd give it a try myself and see where it takes me. So here I am...

While the websites for beginners are really good and have some individual pieces of information that are valuable I could not find a site which gives enough information for a brand new starter of this craft. Forums tend to be really good for any advice however I am still to find a forum that has more information on Wire Jewellery as opposed to other types of Handmade Jewellery. So from now I will post information on any obstacles I have come across or any important facts/observations that would be useful to a newbie like me.

Watch this space! :)